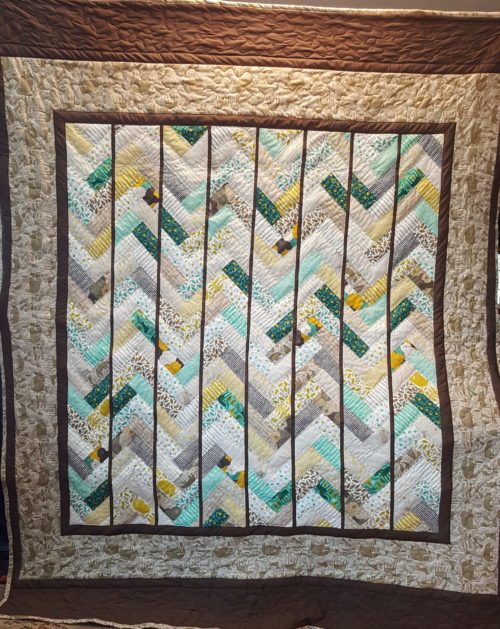
On The Mountain Top Quilt
I had this cute jelly roll by Moda called Big Sky. I wanted to do something different and fun with it and decided that I would try some kind of braided look. As I was working with it, my design changed and formed into what I call On The Mountain Top. When it was finished I felt it looked liked a mountain range through a window. I hope you enjoy this design as much as I did.

I first started out by cutting up my jelly roll strips into 5 1/2 inch pieces, DO NOT cut off the salvages just yet. I needed to get 8 pieces out of each strip and that meant that I had to leave a little of the salvage on. Don’t worry it was all tucked away nice and neat in the 1/4 inch seam. After they were all cut up I arranged them on my quilt wall and rearranged them until I liked the way they looked. I decided I liked it to be wider than longer and so I went with 8 rows with 40, 5 1/2 inch strips in each row. I started to sew them together by taking the top two pieces and laying the second piece, right sides together, perpendicular on top, like in the picture below, and sewed straight across the bottom of the first piece.

Iron back the second piece and you will see that it makes a “V” shape or a sideways “L” however you want to look at it. Next I took the third piece in the row and attached it to the side of the first piece and the bottom of the 2nd piece like you see in the picture below, and the I ironed it back. The fourth piece I sewed on the side of the second piece and the bottom of the third piece and continued down alternating sides until I used up all of the forty pieces in that row.


If you want to watch how I put it together and you have a little motion sickness medicine handy watch the video below. My sweet son was trying to help me out and as sweet as he was to help, this video made me slightly ill. If you think that you spy a Missouri Star Quilt Company lanyard in the video, then yes you are right, I am a fan! I also have to give a little shout out to my little Panasonic Cordless Iron and Martelli Rotary Mat and Iron Board. They are so handy and small enough that they just sit right next to my machine for a quick access to a quick cut or place to iron. Love them!!
After you have all eight rows finished you will need to trim the edges. I used my Omnigrip 6-Inch-by-24-Inch Non-Slip Quilter’s Ruler with a Gypsy Gripper to hold it firmly down. If you lay the ruler exactly in the middle of the braid you will see that you only have to trim off little triangles left over on the side of the ruler. See the pictures below. The ruler lays right between the top corners of each strip that is sewn on.


Once all the rows are trimmed to the same size, I decided to flip every other row upside down so that the arrows were pointing in the opposite direction. I measured the rows and cut 1″ sashing to go in between each of the rows and then sewed them all together. After all the rows and 1″ sashing were sewn together I bordered the rows with a 2″ border. A 8″ border was put on after that with a coordinating fabric.

I decided that I would like it longer to fit a twin bed and to give it a more masculine look, so I measured the sides of the quilt top and added 2.5″ wide strips on either side. Then I measured the top and bottom and a 10″ header and footer. I loved the way it turned out. I hope you do too.


Get Social